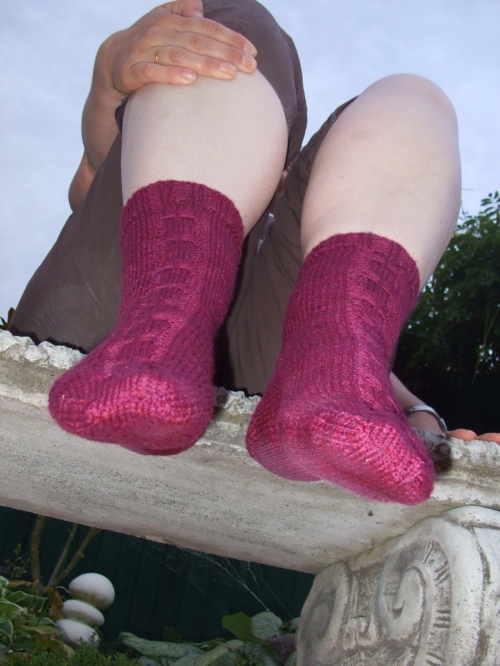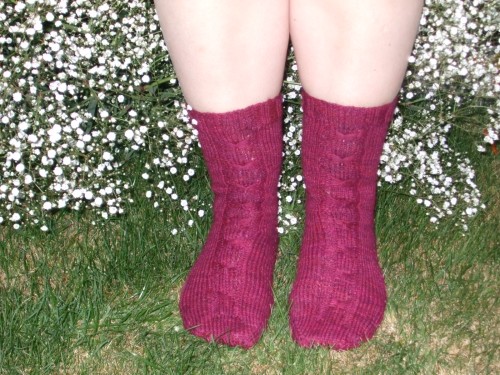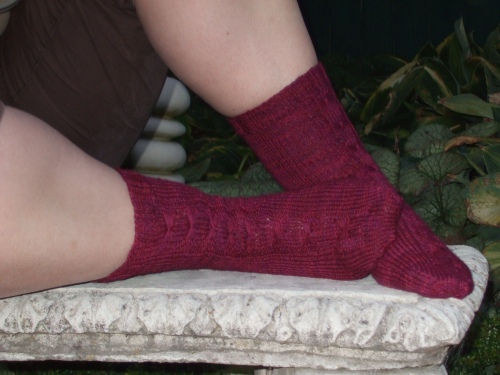
I cannot think of more inappropriate weather for hand knit woollen socks. It has reached sweltering temperatures today, topping 36 degrees according to the evening news, and some suburbs were hotter than that. But despite this, I continued to knit the pair of socks I have been designing, even while driving our non-airconditoned car (strangely, 1954 Morrises were not equipped with air-con).
Now, before I share the pattern, credit where credit is due: I based this pattern on a standard sock size for Sport weight/5 ply yarn. I adapted a stitch pattern I saw on the pattern Flutterby, which I thought was gorgeous but a tad too ambitious for me right now. The heel and toe instructions I adapted from Nancy Bush’s book Knitting Vintage Socks.
The pattern is a Sport weight because I wanted something that knit up fast. I want to enjoy my knitting, and these are basically no count socks once you get going – you won’t need to be poised over the pattern all the time, you can do them watching TV or while the kids are around. But they aren’t totally plain, and they are patterned enough to be special. I think that they are ideal for semi-solid colours, or a light to medium solid colour yarn.
The yarn that I used was Paton’s Bluebell which is not as soft as I would like, so not my ideal choice. I dyed it myself using acid dyes, the other day (yep, that yarn 🙂 ) The colours are Cranberry, Raspberry and Boysenberry, made fairly concentrated. I knit them using magic loop, and the instructions are for magic loop. They are worked with a French Heel and a Flat Toe.
Errata added in bold 25th March ’09 in heel flap reorganisation round.
And here are the socks, and the pattern so that you can knit yourself a pair!

Cast on 48 stitches onto a 3.25 mm needle – I used my new Knitpicks tips on an 80cm length to magic loop.
Divide stitches so that needle 1 has 22 stitches, and needle 2 has 26. Join for working in the round, being careful not to twist the stitches.
Cuff: Work k2, p2 ribbing for 12 rounds, which should be approx. 1.5 inches from the beginning.
Leg: Set up round: Needle 1: Knit 20, purl 2 Needle 2: Knit 5, purl 2, Knit to last stitch, M1 (total 49 stitches)
Row 1, 3, 5, 7, 9 Needle 1: Knit 20, P2. Leave the yarn forward. Needle 2 slip the next 5 stitches, leave yarn forward, p2, knit to end of round.
Row 2, 4, 6, 8: Needle 1: Knit 20, P2 Needle 5: Knit 5, P2, Knit to end of round.
Row 10: Needle 1: Knit 20, p2. Needle 2: Knit 2, pick up the five slipped stitches with your left needle. Knit the next stitch through the back loop – knitting the 5 slipped stitches with the live stitch. P2, knit to end of round.
Knit 5 rounds then repeat rows 1-10
Knit until leg measures 6.5 inches from cast on. (This was 4 repeats of the pattern for me)
Next round: Reorganise the stitches for the heel. Keeping the established pattern, knit the stitches of needle 1 plus 14 stitches off needle 2. Slip them across together. Knit the remaining stitches of needle 2 (13 stitches ) plus the first 12 stitches from needle 1. Group together these 25 stitches. These will be worked for the heel flap. Leave the other 24 stitches on the needle for the front of the foot.
Heel Flap: Slip the first stitch of every row.
Begin with a purl row: purl across all stitches
Knit row: k 12, p1, k 12.
Purl row: p 12, k1, p11.
Repeat the knit and purl rows 12 times (24 rows in total).
Turn heel:
Row 2: Sl 1, p4, p2tog, p1, turn.
Row 3: Sl 1, k5, ssk, k1, turn.
Row 4: Sl 1, p6, p2tog, p1, turn.
Row 5: Sl 1, k7, ssk, k1, turn.
Row 6: Sl 1, p8, p2tog, p1, turn.
Continue working in this pattern until all heel stitches are worked.
Gusset:
Knit across the heel stitches, then with the same needle (needle 1), pick up and knit 13 stitches along the right side of the flap. Use Needle 2to work across the instep stitches (keeping the established pattern in place), place a stitch marker then pick up and knit 13 stitches along the left side of the flap.
Decreases:
Round 1:
end of round—2 stitches decreased.
Rounds 2 and 3:
Knit all stitches in established pattern
Repeat Rounds 1–3 until 49 stitches remain.
Continue to knit keeping the pattern correct until your sock measures 1.5 inches less than your desired length. Then work the toe decreases.
Toe decreases: First row, rearrange stitches so that needle 2 has 24 stitches (this is the back of the foot) and needle 1 has 25 stitches. This should be the butterfly panel and 7 stitches either side. (you might have to rename your needles at this point!)
Decrease round:
Needle 1: k 1, ssk, knit across to centre of butterfly panel, k2 together, knit to 3 stitches before the end of the needle, k2 tog, k1
Needle 2: k1, ssk, knit to 3 stitches before the end of the needle, k2 tog, k1
Round 2 and following even rounds: Knit all stitches
Round 3 and following decrease rounds:
Needle 1: k 1, ssk, knit to 3 stitches before the end of the needle, k2 tog, k1
Needle 2: k1, ssk, knit to 3 stitches before the end of the needle, k2 tog, k1
Repeat decrease and alternate rounds until 12 stitches remain on each needle.
Graft the remaining stitches together using Kitchener stitch.
And enjoy!


Lovely – one day i’ll actually finish a PAIR of socks for me – I have just 1 knitted sock as I never got around to the 2nd 😳
They look great, well done
Great looking socks! They may not suit the weather now, but there will come a time when you want something cozy on your feet….
Gorgeous S! They look lovely.
They look wonderful!! I will put this on my winter to do list
What a fabulous sock pattern! They are lovely, and have just enough style to make them cute to wear and mindless to make (I am always saying, “SHHHH! Mom’s counting!” while I make socks) and I am quite impressed that you dyed them yourself–I just jove the subtle color variation. What is wonderful about this pattern is that it could be readily adapted to knitting both socks at once on the majic loop (which is now the only way I now knit socks–hate having one done, one to go)…well done!
And so appropriate for our weather in Chicago…Early April now and we’re expecting snow!!! Thanks for a great pattern!
Thanks 🙂 I really enjoyed making them, and I’m delighted to say my sister loved them and they fit perfectly.
Nice pattern thanks!